Mandy Theis, Author at School of Atelier Arts - Page 8 of 8

Author: Mandy Theis

  • YES, YOU CAN WEAR THAT COLOR

    YES, YOU CAN WEAR THAT COLOR

    How to un-banish a color from your wardrobe and find the right version of it for you.

    color theory

    I used to think that I could NOT wear the color yellow. “Ugh,” I thought when I saw yellow. Or I would see the cutest shirt but not even try it on because I assumed yellow just wasn’t for me. But the truth was that I just didn’t know how to find the right yellow for my coloring.

    So how do you turn your list of banned colors into the right colors that actually look great on you?

    The key is to look at lots and lots of variations of the color you think you cannot wear. It’s best to be methodical here in order to find the best version of the color for you. Luckily for us, artists have a great way to organize color, and I am going to take you through an artist thought process in this article to help you find the perfect version of your most challenging clothing color.

    In this example, I will talk about my former nemesis, yellow, but you can substitute this method for any color that is giving you trouble.

    Try Changing the Lightness and Darkness of the Color

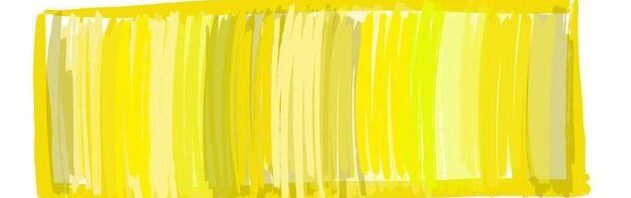
    The first step when using an artist’s thought process to think about color is to consider how light or dark the color is. So when I was searching for my perfect yellow, I tried on garments with very dark versions of it (deep mustard) very light versions of it (pale yellow rose) and every level of light and dark in between. Keep notes about your discoveries. Which ones looked good with your coloring? Which ones were obvious “no’s”?

    Pro Tip: Even if you are SURE that a certain color will look terrible on you, try it on anyways. The colors that teach you about what doesn’t work are just as informative for guiding your search as the color you are ultimately looking for.

    I discovered that my best version of yellow was pretty light in value, and that dark yellows were definite “no’s” for me.

    Enjoying this article? Join our popular newsletter full of art delights.

    Try Changing Which Direction the Color Leans

    After finding light and dark yellows, the next thing I did was start playing with yellows that leaned towards orange (sunflower) and yellows that leaned towards green (lemon) on the color wheel. Artists call this changing the “hue” or describe it as “warm” (for leaning towards orange) or “cool” (for leaning towards green).

    Here is a quick reference for every color:

    Warm red – Stop Sign Red (leans towards orange)
    Cool Red – Maroon (Lean towards purple)

    Warm orange – Sweet potato – leans towards red
    Cool Orange – Sun – leans towards yellow

    Warm Green – Spring Grass – leans towards yellow
    Cool Green – Kentucky Blue Grass -leans towards blue

    Warm Blue – Cerulean – leans towards yellow
    Cool Blue – Indigo – leans towards purple

    Warm Purple – Grapes – leans towards red
    Cold Purple – Violet – leans towards blue

    I discovered that I needed a yellow that was not too warm and not too cool to match my coloring. My best yellow was almost exactly in the middle of all the warm and cool yellows I tried on.

    Try Changing the Intensity of the ​Color

    The last variable is sometimes the trickiest for artists to describe. The intensity of a color is how pure it is versus how neutral it is.

    For example, when I was looking for different intensities of yellow I tried on yellows that almost burned my retinas with how intense they were (neon yellow) and yellows that were so dull that they barely count as yellows (dirty honey). There are, of course, all the version of yellow in between dull and intense as well. Think of it as a scale with neon yellow on one end and dirty honey on the other. In-between intensities might include dandelion – less intense than neon yellow but more intense than dirty honey.

    My New BFF, Sunny Butter

    At the end of my experiment I discovered that a light-colored, somewhat intense yellow that was neither too warm nor too cold was just right for me. I like to think of it as “Sunny Butter” when I am looking for that cute swimsuit or winter scarf to bring a little of that wrongfully exiled color into my wardrobe.

    By following this artist method for thinking about color, you will discover that all colors have these three variables to them – lightness/darkness, warm/cool, and intense/dull. You can run this experiment for every color to greatly expand your wardrobe choices.

    Yes, you CAN wear that color, you just have to find the right variation of it for you.

    Want to learn more color theory? Check out our free art lesson plans and join our popular art newsletter.

  • ATELIER/ARTIST DICTIONARY

    ATELIER/ARTIST DICTIONARY

    What is Atelier? Notional Space? Contours?

    Fret not my friend, this is your go-to artist dictionary for all those wonky terms people who draw and paint realistically like to throw around. This is an ever expanding project, so check back regularly for the newest definitions!


    Atelier: The French word for “studio”. A place where artists learn realistic drawing, painting, and sculpting skills.

    Want to start atelier training? Here’s how.


    BedBug Line: Also known as a core shadow, it is a line that is slightly darker on the edge of a shadow that is the exact place where a form turns from light towards shadow. This term is rarely defined in other artist dictionaries.

    Chroma: The intensity of a color. The opposite of neutral. A very chromatic color is often described as “bright”. A stop sign is a very chromatic red. Bricks are also often red, but not as intense as a stop sign. Bricks are less chromatic than a stop sign.

    Learn more about color with our Yay! Color Theory Worksheets

    Color Wheel: A circle that shows colors. Some color wheels show just the hue. Some show hue + chroma, or hue + value.

    artist dictionary
    Contour Line: 
    A line that is used to describe the shape of something.

    Envelope: A small number of straight lines that represent the overall biggest shape of your subject.

    Ferrule: The part of a paintbrush that attaches the bristles to the handle.

    Hue: The location of a color on the outermost circle of the color wheel. Red, orange, yellow, green, blue, and purple are all hues. If a blue hue leans green, the hue is a blue-green. Hues are sometimes confused with color intensity. Hues are the most pure form of every color. So a brown color would be described as having an orange hue that has been neutralized.

    Learn more about color with our Yay! Color Theory Worksheets

    Local Color: The base color of a subject. For example, the base color of an apple might be red, even if it has bright yellow highlights are dark blue shadows. Local color is an important word for any artist dictionary

    Neutral: The opposite of “chroma”. Every color has its most intense version, and also a version that is so close to a greyish neutral that it is hard to tell there is any color to it at all. There is a scale from chroma to neutral that every hue has, from most intense to least intense. When colors are less intense, they are described as neutrals. A bright orange fruit would be  described as a chromatic orange. A wood floor is still orange in hue but is more neutralized than an orange. Then there is a wall that seems almost grey but has the barest hint of orange to it, which would be described as a very neutralized orange.


    Notional Space: 
    The proportions of your subject if you were to imagine a box going around it and touching it on all sides.


    Outer Contour:
     Similar to a contour but describes specifically the outer most shape of a subject.


    Want to start atelier training? Join our Ateliyay! Painting Bootcamp today!

    Proportion Box: Another term for Notional Space. The proportion box represents the amount of space your subject takes up if you were to imagine a box going around it and touching it on all sides.

    Sight-Size: When you draw or paint your subject at the exact same size that you observe it. Learn more here: https://www.studydrawing.com/sight-size

    Value Scale: The standard atelier value scale has 9 increments of value from darkest to lightest. 1 represents the lightest and 9 represents the darkest.

    Are there words you would like to see added to this dictionary? Let me know in the comments below.

    Make sure to join our mailing list for art delights delivered right to your inbox.

    Want to start atelier training? Join our Ateliyay! Painting Bootcamp today!


  • What Is An Atelier? A Guide to Atelier Training

    What Is An Atelier? A Guide to Atelier Training

    If you were ever curious about ateliers in an art context, this article will answer all your questions from “What is an atelier?” to “How do I get atelier training?”

    what is an atelier

    What does “Atelier” mean?

    “Atelier” is simply the French word for “studio”. It is a place where artists train in order to master realistic drawing and painting skills. Today, this French term continues to be in use. This is because France is where many American painters acquired their realistic drawing and painting training throughout the 19th and early 20th centuries.

    What about today?

    Today, the term “Ateliers” refer to specialty art schools that train students in realism drawing and painting skills. Essentially, they teach you how to draw realistically like the Old Masters. The School of Atelier Arts runs an online atelier called Ateliyay! Painting Bootcamp.

    By mastering technical drawing and painting skills, artists are able to achieve on paper and canvas anything their heart desires.

    Learning how to draw is the same as learning any other skill.

    There is no magic to it.

    It simply requires focused practice under the tutelage of a master.

    If you want to learn how to draw at a high level, you need to train with someone who has the skills you are looking for. You also need to devote a significant amount of time and effort in order to learn it.

    You can find people with high levels of drawing training willing to teach you how to draw realistically in places called “Ateliers,” like the online Ateliyay! Painting Bootcamp.

    Enjoying this article? Join our newsletter full of art delights today!

    How does Atelier training work?

    Below, you can see examples of my plaster cast drawings before attending an Atelier and after attending an Atelier.

    Ateliers are VERY good at teaching you technical drawing and painting skills. By attending an Atelier, anyone can efficiently master the art of realistic drawing and painting.

    The main idea behind Atelier training is to start students with very basic concepts, and build to more complex concepts.

    This is why many Ateliers will have students draw for a year or more before moving onto painting. By focusing on drawing first, students are able to master shape, line, and form before adding in even more complex concepts that are introduced with color.


    Cast Drawing before Atelier Training
    Cast Drawing after Atelier Training

    Where did Atelier Training come from?

    The vast body of knowledge required to draw and paint realistically can be found in Ateliers. This collected body of artistic skills and ideas comes from many different places.

    For example, in Western art the primary method of showing depth in a picture plane is to use linear perspective.

    But that is not the only way to show depth in a picture plane.

    In Japanese ink painting, artists developed a way of showing the depth of a picture plane by changing the hardness and softness of the edges of their subjects. For example, a mountain that was intended to look very far away would have a soft, fuzzy edge to account for atmospheric perspective.

    Later, The Impressionists adopted this Japanese idea of showing depth into their work and it became part of the collective body of atelier knowledge.


    Enjoying this article? Join our newsletter full of art delights today!


    Just as the collected body of math knowledge has multiple origins (Arabic numerals and the Pythagorean Theorem just to name a few), Atelier knowledge has multiple origins across many cultures and time periods.

    The intent behind Ateliers is to collect and share what is already known about technical art skills with the next generation of artists. In this way,  the collective body of visual knowledge continues to expand.

    Why Choose Atelier Training?

    Unlike traditional university art programs that often emphasize conceptual or abstract approaches, Ateliers focus on technical skill development. This type of training is ideal for artists who want to draw and paint realistically with confidence and without that nagging feeling of it being not quite right.

    Whether you’re an aspiring fine artist, illustrator, or even a tattoo artist looking to improve your realism, Atelier training provides the essential skills to bring any artistic vision to life.

    Additionally, many contemporary Ateliers offer flexible study options, including online courses (like our Ateliyay! Painting Bootcamp), part-time study, and intensive workshops, making it more accessible than ever to receive classical training.

    Contemporary Ateliers

    The contemporary Atelier movement strives to provide equitable access to artistic knowledge. By mastering what is already known, artists have free choice in what techniques and skills to utilize in their own artwork.

    In fact, The School of Atelier Arts runs an online atelier. You can learn more about our Ateliyay! Painting Bootcamp here.

    If your heart has ever pined to be able to draw and paint your ideas exactly the way you envision them, Atelier training is for you!

    How to Get Started with Atelier Training

    If you’re eager to dive into Atelier-style learning, there are many ways to get started:


    ✔️ Enroll in an Atelier program—Research schools that align with your goals, whether in-person or online.
    ✔️ Self-study with Atelier techniquesStart with Bargue Plates and cast drawings to develop your skills.
    ✔️ Take an Atelier-style workshop—Many Ateliers offer short-term courses for those who want a taste of the training.
    ✔️ Follow along with online resourcesOur YouTube channel features instructional videos that introduce key Atelier techniques! Make sure to like and subscribe to both the School of Atelier Arts and Da Vinci Initiative channels!

    🎨 Want to see Atelier training in action? Watch our YouTube tutorials for step-by-step guidance and subscribe for more classical drawing and painting lessons!

    👉 Watch Now

    By following the time-honored methods of Atelier training, you’ll gain the skills necessary to bring your artistic vision to life with accuracy, depth, and expression. Whether you’re just starting or looking to refine your craft, an Atelier education is an invaluable path to artistic mastery.


    Author

    Mandy Theis is a licensed K-12 art teacher and former Co-President of the Washington Art Education Association. She knows that anyone can learn to draw and paint realistically that as access to a teacher with these skills. Ready to improve your drawing and painting game? Join her newsletter for lesson plans, musings, & other art delights delivered right to your inbox.

    Keep reading to expand your art knowledge:
  • NEW BEGINNINGS IN ARTEDUCATIONLAND

    NEW BEGINNINGS IN ARTEDUCATIONLAND

    art education
    Mandy during her atelier training in Seattle, WA circa 2014

    Do you take yourself seriously as an artist?

    Every now and then, it’s important to take time for planning out our hopes and dreams. We need to take time for some big goal-setting for how we want to shape our lives and the lives of our students. Sometimes we just need to take a deep breath and jump into new things. Like sky diving errr… or maybe something even scarier like taking ourselves seriously as professional artists.

    Becoming a Serious Artist

    Not too long ago, I remember feeling like I wanted to be a “serious” painter but thought I wasn’t able to because I was an art teacher. I felt that the whole upper echelons of the art world looked down on me, and that I had somehow ruined my chances of being taken seriously because I made the grave error of going into art education.

    Boy was I wrong!

    Enjoying this article? Join our newsletter for art lessons delivered right to your inbox!

    Please note that this post contains affiliate links. You can read our affiliates policy here.

    My Journey

    Nearly 10 years ago, while I was teaching K-12 art in a small, rural school district in Montana, I read a book by Juliette Aristides titled Classical Drawing Atelier. This book opened my eyes to the idea that art can be taught at very high technical levels. I learned that Rembrandt didn’t wake up painting like Rembrandt – he trained for many years in an atelier to achieve his technical proficiency.

    What a revolution to realize that the painters I admired most – Rembrandt, Da Vinci, Artemisia Gentileschi, Augusta Savage – ALL trained in ateliers. Even more amazing is when I realized these schools still exist.

    From that point forward, I did everything I could to acquire an atelier education and share this knowledge with other art teachers. In fact, I am very proud to share with all of you that the School of Atelier Arts has partnered with another contemporary atelier – The Florence Academy of Art – to create a Master’s Degree program designed with art teachers in mind. You can now earn your accredited Master’s in Studio Art in just 3 summers with both remote and in-person options available.

    Want to start atelier training? Join our Ateliyay! Painting Bootcamp today!

    Where is YOUR journey taking you?

    I hope this is the year that you take your own art seriously and start your journey with teachers from all over the country under the tutelage of atelier instructors. This is the year that, like Da Vinci, you can train in an atelier to master the craft of drawing and painting. Make this the year that you start earning your Master’s degree (and that pay bump!) and elevate yourself to the realm of “serious artist” with an astounding new skillset.

    I’ll be cheering you on all the way!

    What does your dream Master’s Degree program look like? Let me know in the comments below!

    Author

    Mandy Theis is the Director of School of Atelier Arts & Author of Department of Aesthetics Blog. Join her monthly newsletter for free art lessons and other delights.

    Want to start atelier training? Join our Ateliyay! Painting Bootcamp today!


  • NOTES ABOUT NOTICING

    NOTES ABOUT NOTICING


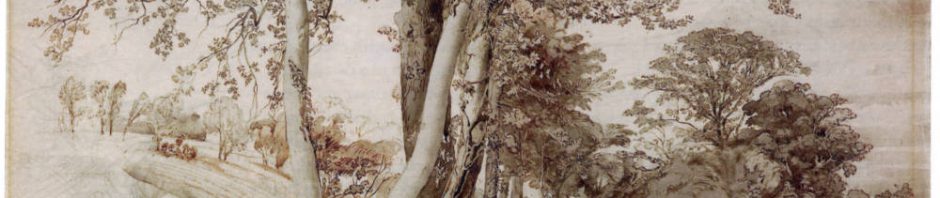
    Tree Study by John Ruskin (1819-1900) Ruskin Foundation, Ruskin Library, Lancaster University


    “That woman poached a couch and skinned it!”
    This what my friend and fellow painter exclaimed to me in a coffee shop one day.  I glanced up to see a woman wearing a rather unflattering plaid coat, and he was right, there was something about that particular pattern that just screamed “COUCH!” 

    As fellow artists, we started to analyze the visual conundrum before us. Why exactly was that particular plaid so couchy when many other plaids went unnoticed?  Several cups of coffee later we concluded that the size of the plaid was smaller and tighter like is often seen on upholstery, and that the texture of the coat also lent it a 1980’s couch vibe.

    Now, perhaps to some people spending an hour analyzing why a visual stimulus creates a certain feeling would seem frivolous. However, training your eye to see better brings all sorts of visual effects into focus, often in interesting and informative ways. I can only imagine how many people felt something unusual when seeing that woman’s coat but did not know what it was. By looking carefully with a trained eye it becomes easier to identify when you are being visually manipulated by a coat to think “COUCH!”.

    Enjoying this article? Join our popular newsletter for monthly art delights delivered straight to your inbox.

    I used to live on a street with the sassiest tree you ever saw.

    Coats aren’t the only inanimate objects with the ability to manipulate your visual senses. I used to live on a street with the sassiest tree you ever saw. I mean, this tree had attitude. The gesture of this tree just oozed sass.

    ​To give you an idea of what it looked like, it grew from the space between the sidewalk and the road, and for the first few feet from the ground the trunk raised up in the expected direction. Now I don’t know what this tree’s growing years were like, but there was a somewhat sudden curve in the trunk towards the street, and then an equally sudden curvature back towards the sidewalk. The effect was truly unique – it looked exactly like the tree was sticking out it’s hip over the street, as if to dare any passing car not to stop and ask what was wrong. It was the gesture I make when I can’t believe my boyfriend is asking me to do my half-load of laundry directly after washing his own half-load without including mine. You know, the “are you kidding me?” hands-on-thrust-out-hip gesture.

    I made a habit of pointing out the sassy tree to my neighbors, and we all found community and joy in knowing that our neighborhood boasted the sassiest tree on the planet. Not many other neighborhoods can say that. The fanciest and most exclusive living communities in the world would not be able to replicate our tree if they tried – the gesture was too perfect, forged through years of the circumstance that created it, and it was ours to revel in.

    When you spend time learning how to draw or paint, what you are really practicing is your seeing. When you are constantly asking yourself “what makes this thing look like this thing?” you subconsciously start asking yourself that every time visual input happens in your life, whether in a coffee shop or walking down the street. Poached couches and sassy trees – these are just a few of the visual delights that await the practiced observer.

    Want to enhance your own drawing and observation skills? Check out our Ateliyay! Curriculum today!

    Mandy Theis is a classically trained artist and certified K-12 art teacher based in the NYC area. You can follow her on Instagram @mandyfineartist. What visual delights bring YOU joy? Leave your comments below :)

  • HOW TO DRAW A ROSE PART II

    HOW TO DRAW A ROSE PART II

    “Atelier” is simply the French word for “studio”. It is a place where artists train in order to master realistic drawing and painting skills. Today, this French term continues to be in use, as that is where most American painters acquired their realistic drawing and painting training throughout the 19th and early 20th centuries.

    Review

    In How to Draw a Rose Part I, we discovered how to correctly identify the proportion and biggest shape of our rose. In Part II, we will use these big ideas to find the rest of our lines and shapes.

    Want to start atelier training? Join our Ateliyay! Painting Bootcamp today!

    Step 1: Find the next biggest shape

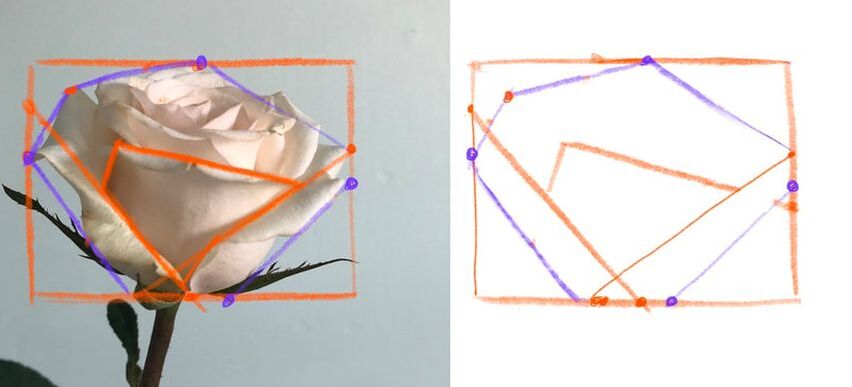
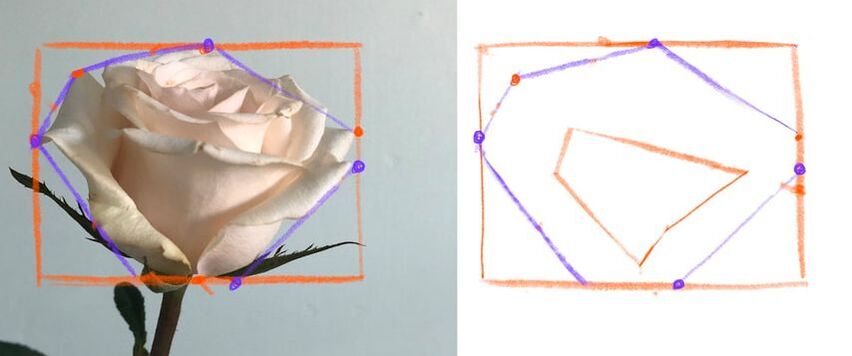
    Once you have successfully found the biggest shape of your bloom, you now want to determine what the next biggest shape is. When looking at the petals, which petal is the biggest?

    Once you decide on your biggest petal, use the same method of simplifying it into one big shape that we used on the bloom as a whole. Remember to use a small number of straight lines that describe the shape of your biggest petal.

    how to draw a rose


    Step 2: Use follow-through lines to draw the next biggest shape

    We want to replicate this shape in our drawing, but we have to be careful. If we do not think about how this smaller shape relates to the whole, we are likely to put it in the wrong place or make it the wrong size.

    Luckily, there is a method artists use to correctly place smaller shapes within bigger shapes that is called a follow-through line.

    follow-through line is a line that extends beyond the shape it is describing until it hits the proportion box​.

    By extending the line we are trying to place until it hits our proportion box, it makes it waaaaay easier to translate that line to our drawing because we already know how to translate lines that hit the outer edges of our box. (Not sure how to do this? Check out How to Draw a Rose Part I)

    how to draw a rose


    Step 3: Use follow through lines to translate the entire shape to your drawing.

    how to draw a rose


    Step 4: Erase back the lines you no longer need

    how to draw a rose


    Step 5: Repeat for your next biggest idea

    Use this same method for your next biggest idea. Sometimes big ideas are the next biggest shape that you see, such as the petal we just completed in Step 4.

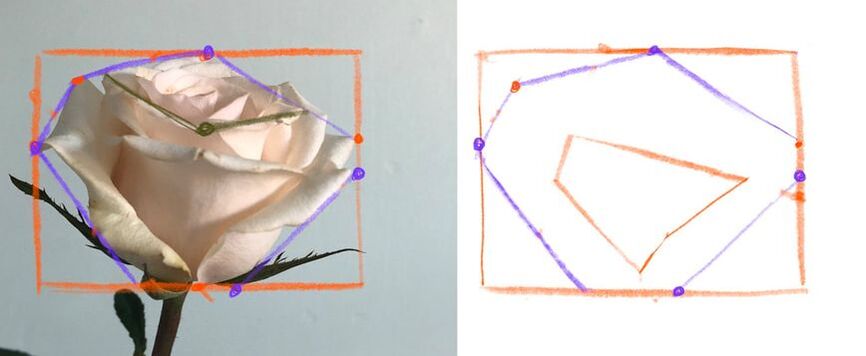
    Other time, the next biggest idea can be something more abstract. In the image below, the two green lines represent a different kind of big idea. They are showing the separation of the top plane from the side planes.

    This is a big idea because conceptually, it is very important for artists to be able to think in terms of big planes when adding the shading (more on this in a future post).

    Use follow through lines to correctly place the green lines on your rose drawing.

    Want to start atelier training? Join our Ateliyay! Painting Bootcamp today!

    how to draw a rose
    how to draw a rose


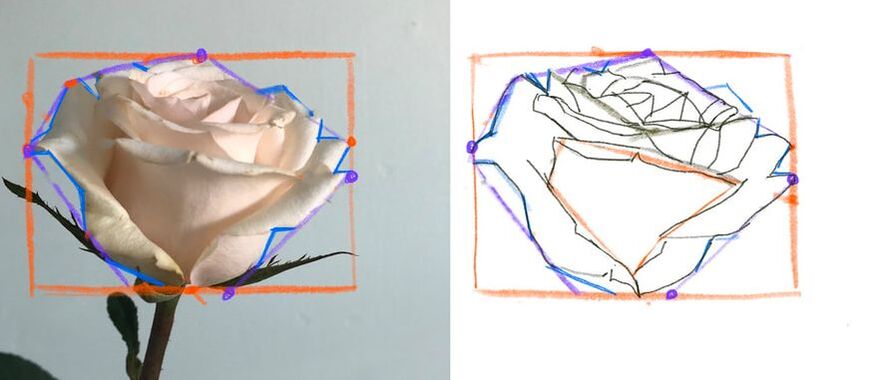
    Step 6: Use big shapes as landmarks to refine your outer contour line.

    Once you have a few big shapes placed accurately in your drawing, it gives you the reference points you need to start adding the ins and outs of your outer contour line, or outermost shape.

    how to draw a rose


    Enjoy this article? Join our popular newsletter for the latest and greatest art tips, classes, exclusive events & more!


    Step 7: Continue using landmarks to add smaller shapes into your drawing

    Look carefully at your biggest ideas and their relationship to the outer contour lines. What smaller shapes fit in which in-between spaces?

    ​Ask yourself how high and how low each smaller shape is within the whole.

    If you get stuck, use a follow-through line to help you identify where a smaller shape belongs.

    how to draw a rose


    Step 8: Continue adding smaller pieces to the whole

    Now is the time to be extra patient and thoughtful. Make sure you ask yourself lots of questions before placing each smaller shape. Good questions to ask yourself are
    1. If I look at the rose as a whole, how far to the left or right is this shape?
    2. If I look at the rose as a whole, how big or how small is this shape?
    3. If I added a follow-through line to one edge of this shape, where would it hit my proportion box?

    how to draw a rose


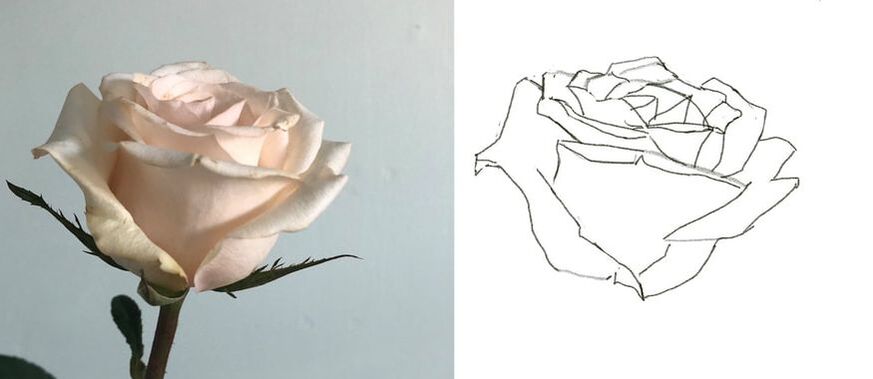
    Step 9: Clean up your drawing

    In order to draw this rose accurately, we made a whole lot of lines that we no longer need in our final drawing. These are known as construction lines. When we are done with our drawing, you want to clean all these lines away so that you have a nice, neat end result.

    If you drew with heavy lines and are having a hard time erasing, a trick you can use is to trace your drawing onto a clean sheet of paper by holding your original drawing up to a window. It’s not cheating if you are tracing your own drawing!

    Want to start atelier training? Join our Ateliyay! Painting Bootcamp today!

    how to draw a rose

    The end.

    I hope you enjoyed this tutorial and that you now have a beautiful drawing of a rose. Remember, though, that I didn’t really teach you how to only draw a rose. This tutorial is really teaching you a method of drawing that you can apply to anything  you want to draw.

    Check out our Ateliyay! Curriculum for more great drawing lessons.

    Want to start atelier training? Join our Ateliyay! Painting Bootcamp today!

    What subject are you going to apply your new drawing skills to next? Let me know in the comments and happy drawing :)


  • HOW TO DRAW A ROSE PART 1

    HOW TO DRAW A ROSE PART 1

    how to draw a rose

    Why a rose?

    Roses inspire many people and are one of the most desired subjects people wish to draw. In this article, I will take you through every step of drawing a rose using a block-in method. By following this drawing method, you will learn a process that you can apply to any rose you wish to draw.

    I am using a photograph for clarity in this post, but I strongly recommend that you draw from life using the same process that is demonstrated here.

    Although this lesson shows you how to draw a rose, it is really teaching you a drawing method that can be applied to anything you want to draw!

    The overall concept is to work from big ideas to small ideas. So let’s get started!

    Want to start atelier training? Join our Ateliyay! Painting Bootcamp today!


    Step 1: Identify how much of the rose you want to draw.

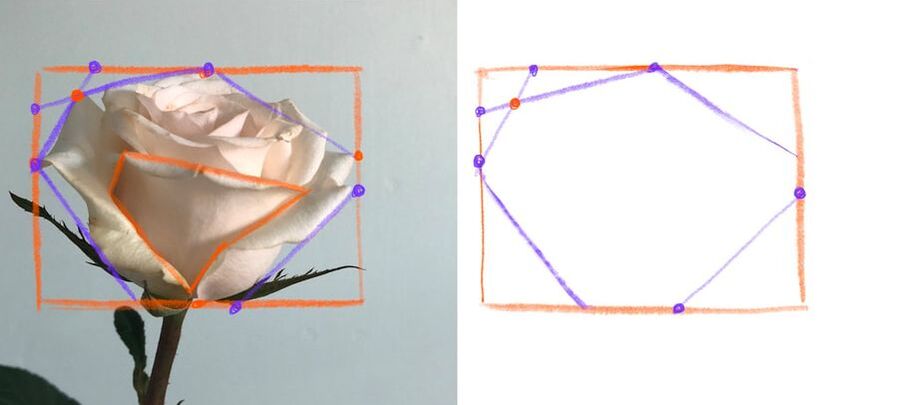
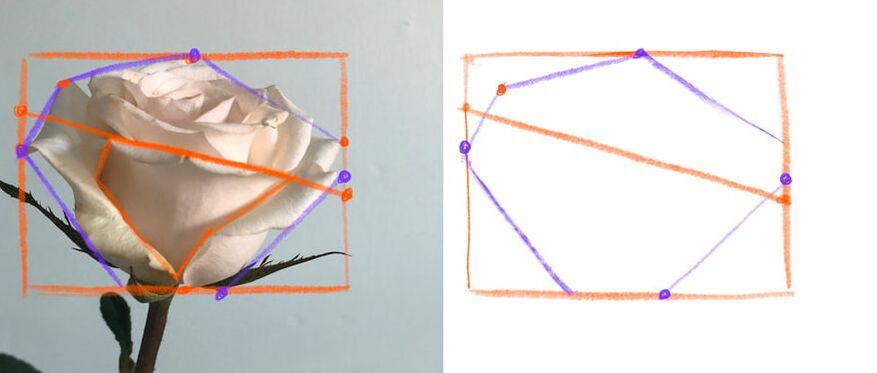
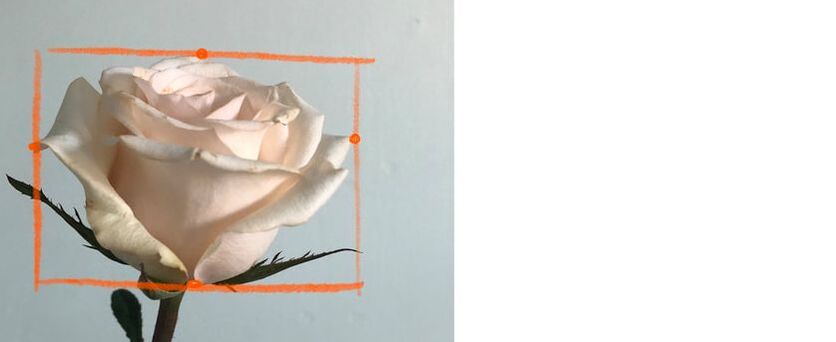
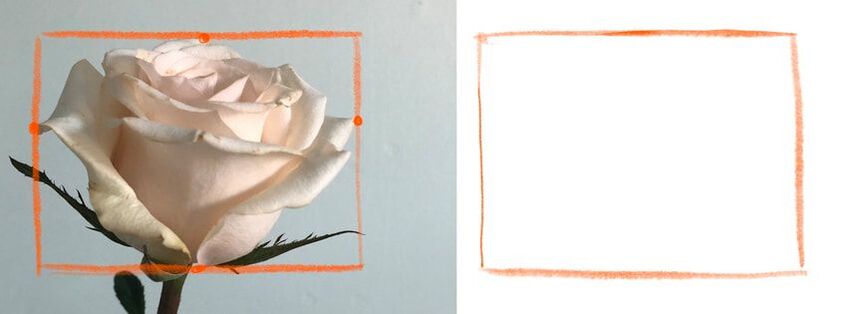
    In this demonstration, we are going to focus on drawing just the bloom. To start, we need to identify the top, bottom, and sides of our bloom.

    Place a dot at the highest, lowest, furthest left, and furthest right most point of the part of the rose that you intend to draw.

    Then, draw horizontal and vertical lines through your highest, lowest, furthest right, and furthest left dots to create a box.

    This box is called your “proportion box” and represents the height vs width of your bloom.

    how to draw a rose


    Step 2: Draw the proportion box on your paper.

    Is the box taller? Or fatter? It’s fatter. Now is it a whole lot fatter, or just a little bit? It’s just a little bit fatter. So you need to draw a box on your paper that is just a little bit wider than it is tall.
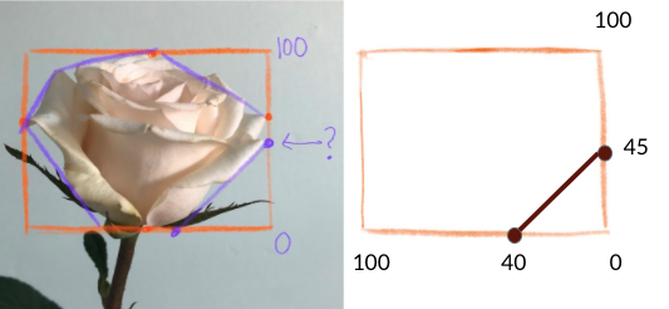
    ​The size of this box doesn’t matter, as long as the proportion of the box is accurate to what you observe in your subject.

    Want to start atelier training? Join our Ateliyay! Painting Bootcamp today!

    how to draw a rose


    Step 4: Find the biggest shape

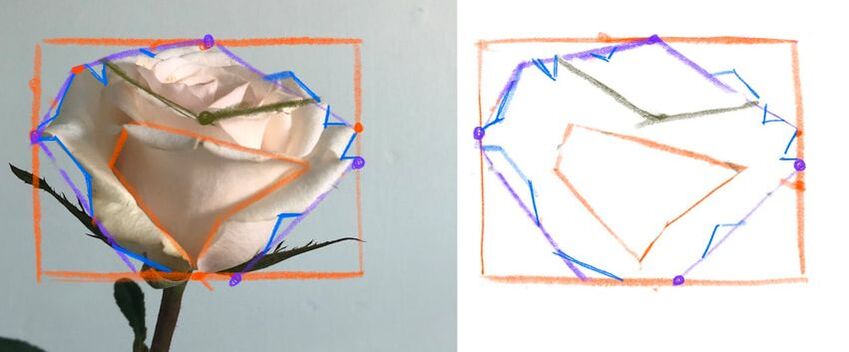
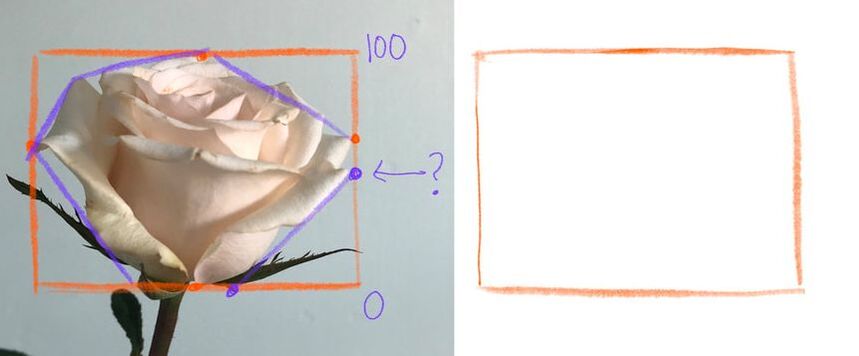
    When drawing realistically, you always want to find the biggest ideas first. In this case, we want to identify the biggest shape of our bloom. This is often called an ​envelope.

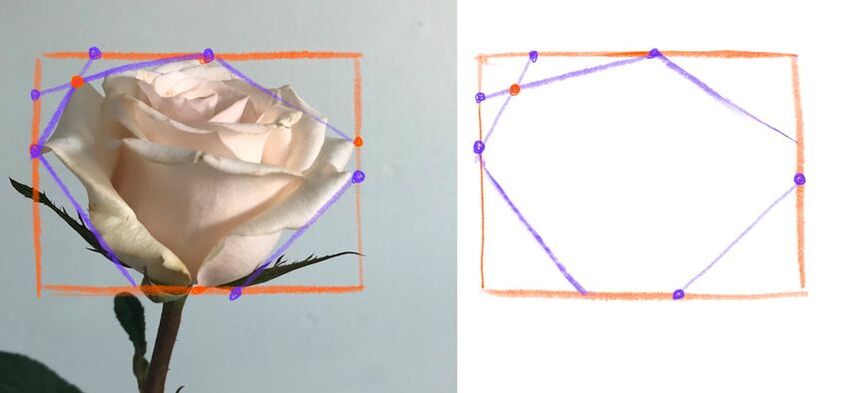
    An envelope is a small number of straight lines that describe the biggest shape of our subject. These lines should be big and not small. It is easy to get distracted by all the little ins and outs of our subject, but notice below how all the little details can be encompassed in one big shape.

    how to draw a rose


    Enjoying this article? Join our popular newsletter for monthly drawing tidbits.


    Step 5: Translate envelope to your drawing

    Now we want to draw this shape inside the box on our paper. Remember, your envelope is touching the top, bottom, and sides of your box. A common mistake is to make the envelope small and floating inside the box. Remember that your box represents the highest, lowest, farthest right and farthest left most points. This means that the envelope must touch the box’s edges in order to be accurate.
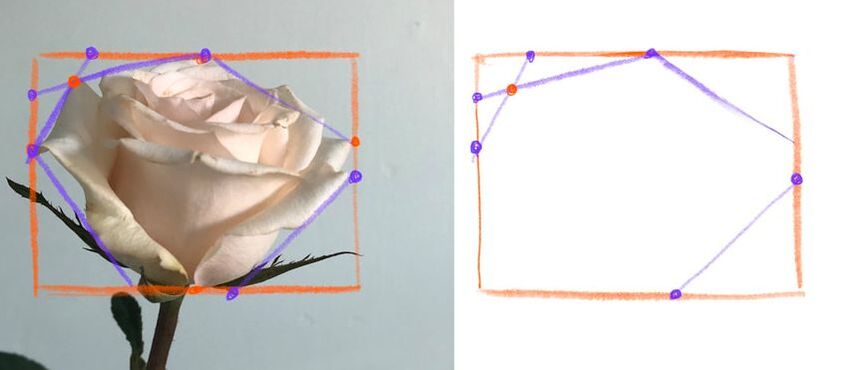
    ​One way to translate the envelope to your drawing is to use the 0-100 method. This method asks if the bottom of your box is zero, and the top is 100, where is the envelope line hitting?

    how to draw a rose

    how to draw a rose


    Step 6: Envelope method #2

    Another way to translate your envelope is to look at the negative space it creates. The negative space is the shape that is made between the subject and the box. With this particular envelope shape, there are lots of triangles that are made in the ​negative space.

    how to draw a rose


    Step 7: Envelope method #3

    Sometimes, you need to translate an envelope line that is not directly touching your proportion box. In this case, our point on the upper left of the rose is not touching the outside box.

    The secret? Extend the line until it does touch your proportion box. This is called a ​follow-through line.

    how to draw a rose


    Step 8: Complete envelope shape

    Every rose you draw will be unique, so it is good to understand all three approaches to creating your envelope shape. Use your favorite approach to finish the last translating the last line of our envelope shape to your drawing.

    Want to start atelier training? Join our Ateliyay! Painting Bootcamp today!

    how to draw a rose


    Step 9: Clean up your drawing

    It is important that you keep your drawing clean as you go. You do not want to get confused as more lines are added. Erase the extra “noise” that you no longer need.

    how to draw a rose


    Congrats! You now have an accurate proportion and shape of your rose.

    Check out How to Draw a Rose Part II to finish your drawing.

    SIGN UP FOR OUR POPULAR NEWSLETTER

    Want more drawing lessons? Check out our Ateliyay! Curriculum.

    Want to start atelier training? Join our Ateliyay! Painting Bootcamp today!

    How did you do?

    How did your rose turn out? Is this your first time using this drawing method? Did it work for you? Let me know in the comments below :)


  • Yes, You Can Draw a Stick Figure

    Yes, You Can Draw a Stick Figure

    Why do grown adults insist they can not draw as well as a preschooler?

    When I tell someone that I am an artist, more often than not they respond with “I can’t even draw a stick figure.” I’m here to tell you that anyone can learn how to draw.

    As a certified art teacher, I happen to know from both anecdotal evidence and the Creative Curriculum for Preschool that drawing stick figures is a 3- and 4-year-old skill. Why, then, do grown adults continue to insist that they are not capable of drawing as well as a preschooler?

    Want to REALLY learn how to draw people? Check out our Yay! People Worksheets here.


    Picture

     
    Many adults would be embarrassed to admit they had a preschool level of math (adding), reading (think c-a-t), or social skills (did you share the office donuts?). Why not take pride in being at least as visually literate as a preschooler by honestly attempting to draw a stick figure?

    When faced with a pencil and paper and pressed to attempt a stick figure, most adults will produce one because it is well within their ability to do so. The statement “I can’t even draw a stick figure” is more often the expression of a belief that “I can’t draw, I’ve never been good at it, and I’m afraid to really try.”
     
    I argue that the issue at hand isn’t that someone can’t draw, it is that they have not yet been taught how to draw representationally (which in my experience is what most people are aspiring to when they say they wish to draw).
     
    Take your figure drawing to the next level. Learn about our Yay! People Worksheets here.
     
    Like reading, drawing realistically is its own set of skills that takes time and training under a knowledgeable person in order to learn. An illiterate person is not likely to be able to teach you how to read, and art instructors without representational drawing training are unlikely to be able to teach you how to draw realistically.
     
    Ready to draw? Download our free art lessons, including Artist’s Stick Figure
     

    Art is a vast field with niches in abstract expressionism and various other non-representational “-isms”. If you want to draw realistically, you need to find an art instructor that has realistic drawing skills, and not all art instructors do.

    So if you have tried learning how to draw in the past and failed, it’s not because you just don’t have “it”. It’s that you didn’t have access to a teacher with the skillset you were looking to acquire.

    “If you want to draw realistically, you need to find an art instructor that has realistic drawing skills, and not all art instructors do.”

    Luckily for you, I am an art teacher with representational drawing training and I am going to show you how to draw a stick figure. Not just any old stick figure, but a good stick figure that will help you draw realistically if you choose to pursue stick figures to their natural conclusions (i.e. full figure drawings).

    Want to start atelier training? Join our Ateliyay! Painting Bootcamp today!


    Hopefully, everyone reading this now 1) believes that they are capable of drawing a stick figure and 2) will give learning how to draw a stick figure an honest try. Good.

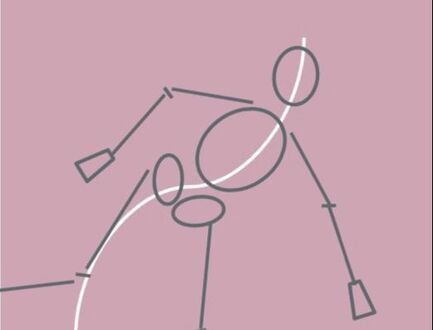
    If you wish to draw a stick figure well, it is important to understand that the “sticks” really represent bones in the human skeleton, which would eventually be filled out with flesh to create a believable figure. In order for your drawing to have a believable feel to it, these “bones” need to be the right proportion to each each other. Otherwise, you might end up with some very fantastical looking beasts, but they won’t necessarily look human.
    So how do you create a stick figure with good proportion?

    This free slide presentation will show you step-by-step exactly how to draw a stick figure with good proportions where the “sticks” accurately represent the sizes of human bones in relation to the figure as a whole.


    You see, you can draw a stick figure. A good one. A useful one. One that you can build on to create more complex figure drawings if you so desire. But first, you have to believe it is possible.

    P.S. Want to learn more art skills? Check out all of our Yay! People Worksheets here.

    Did this article change your mind about drawing? Let me know your thoughts in the comment section below.
     
    Want to start atelier training? Join our Ateliyay! Painting Bootcamp today!
     
  • WHO IS EDWARD MITCHELL BANNISTER?

    WHO IS EDWARD MITCHELL BANNISTER?

    Discover the man who helped change the course of art education and become a founding instructor of the Rhode Island School of Design.

    “Landscape” by Edward Mitchell Bannister from the Smithsonian American Art Museum

    Edward Mitchell Bannister’s Artistic Journey

    You can download our FREE PowerPoint Lesson on this artist here.

    Edward Mitchell Bannister (1828 – 1901) made significant contributions to art and art education, and yet he is largely unknown today.

    As a Black artist, Bannister often faced extraordinary obstacles to obtain high quality instruction, exhibition spaces, and other career opportunities due to widespread discriminatory policies.

    In 1867, the New York Herald ran an especially atrocious article about Black artists, and one phrase particularly caught artist Edward Mitchel Bannister’s attention:
    “[…] the negro has an appreciation for art while being manifestly unable to produce it.” – New York Herald, 1867

    This article inspired Bannister to pursue art at the highest levels. He aggressively studied drawing and painting in private studios in Boston at the famous Boston Studio Building, as well as the Lowell Institute, an outreach education program run by Harvard.

    Bannister’s sketch for the now lost painting, Under the Oaks
     
    In 1876 Bannister entered one of the most prestigious competitions in the world for artists in the 1870’s – the Philadelphia Centennial Exhibition. He won 1st prize for his now-lost painting Under the Oaks. When the prize committee discovered Bannister was Black, there was talk of revoking the 1st place prize. However, the other artists insisted that the committee keep to its selection and the exhibit became a powerful rebuke of the New York Herald article’s assumptions about the abilities of Black artists.

    ​Despite Bannister’s incredible success, he was originally blocked from entering the art exhibit where his 1st place painting was displayed. According to historian David C. Driskill, it was

    ​“not until [Bannister] identified himself as the painter of Under the Oaks was he admitted [into the exhibition].”
    Bannister continued forging a successful pathway as an artist throughout his life, and eventually became a founding member of the Rhode Island School of Design (RISD). RISD was widely regarded as one of the most prestigious art schools in the country during his lifetime, and is still well-known to this day. The university a lasting testament to Bannister’s vision and educational legacy.

    Mandy Theis is a licensed art teacher and Director of the School of Atelier Arts. You can follow her on Instagram @mandyfineartist.

    Want more art knowledge delivered to your inbox? Join our popular newsletter today.

    ​​What are the twists and turns in your art education journey? I would love to hear from you in the comments below.


  • ART TEACHER GUILT

    ART TEACHER GUILT

    What Happens When Art Teachers Don’t Have The Answers?

    Have you ever had students ask you for help with their artwork, and, as their art teacher, you *gulp* didn’t have the skills or knowledge they were seeking?

    This happened to me not so long ago. I had an elementary student who wanted to make people look like they were flying through clouds. I suggested that he place some clouds in front of the figure, and some behind. He came back a few minutes later with the suggested changes and insisted it still wasn’t “right”.

    My art teacher guilt went into full swing at this point.

    The truth was, he had a very clear image in his head of this super realistic drawing of a hero flying through the clouds. But I didn’t have these realistic drawing skills he was asking me to teach him. I had given him everything I knew after just a few rounds of coaching, and I was at a loss figuring out how to help this frustrated child achieve his vision without asking him to settle for something less than he was striving for.

    Please note that this post contains affiliate links. You can read our affiliates policy here.

    The Frantic Search

    That night, my art teacher self frantically researched the internet and every art book I owned trying to find the answers to “How to draw a guy flying through clouds.”

    Nothing.

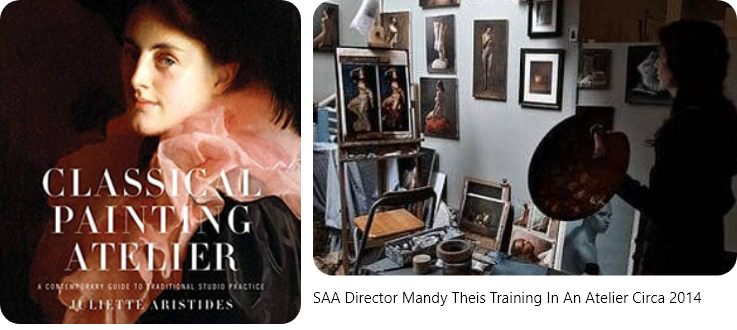
    Then I went to the bookstore, and found Juliette Aristides’ Classical Drawing Atelier and Classical Painting Atelier.

    Within the pages of that book, my entire art teacher world flipped upside down and sideways. I discovered that anyone can learn realistic drawing and painting skills that studies with someone who has what is called “atelier training”.

    I decided right then and there that I wanted this magical “atelier training”. I wanted to be able to help my students achieve their artistic goals.

    I never again wanted to feel the ineptitude and insecurities I felt that day when I couldn’t help my student draw exactly what he intended.

    I wanted to rid myself of my art teacher guilt by mastering the skills my students were asking me to teach them.

    art teacher Mandy Theis training in an atelier

    Joining An Atelier

    The next thing I know, I moved to Seattle and train with Juliette Aristides​ in her atelier. (This is why I always tell people that her books are dangerous! They compel you to learn what your heart has been looking for all these years.)

    Unfortunately, this meant that I would have to take leave of the teaching profession in order to commit myself to full time study for 4 years.

    (But YOU don’t have to – I’ve helped create an online painting class that will teach you atelier painting skills.)

    While I was studying with Juliette, my art teacher friends noticed the transformation in my skills, and they started asking me how they could learn too. But most of them could not leave their jobs in order to train full time.

    I wanted to find a better way for art teachers to access this knowledge and training – a way that wouldn’t force them to make a choice between keeping their job and learning realism skills

    art teacher guilt

    Spreading The Knowledge

    And that’s why I started the Ateliyay! Painting Bootcamp, a program that provides atelier training for art teachers and anyone else that wants to learn how to paint at a high level.

    No More Art Teacher Guilt

    The journey from feeling like an inadequate art teacher to being able to provide realistic drawing and painting training to teachers throughout the country (and world!) has been an amazing ride. I wouldn’t trade it for anything! If you are ready to start your own journey down this path, check out our Ateliyay! Painting Bootcamp today.

    The best part about the atelier journey? I now have the confidence and mastery to help my students achieve exactly what they intend in their artwork, without compromise, and you can too.

    P.S. ANYONE can learn how to draw and paint realistically at very high levels. You just have to train with someone who knows how.